I explained why I am building a weather station and where I intended to place it. I realized that my writing is “narrative” and not instructive and from now on, I will try to be more concise and separate my posts into “why” and “how”.
Sensor Package
Why: I discussed the design requirements in the previous post, so I keep this short. The requirement was for a robust, powered but wireless sensor package that survives environmental challenges for years and accurately reflects its micro climate. The system is also based on a single Arduino Uno because I am not (yet) at the stage to program the ATmega328P directly. This was is my first Arduino project, so the process of getting it done is very slow and my code is sloppy, badly annotated and inefficient. But it works, don’t hate me.
Pretty early I had to decide how I wanted to structure the communication. Since I was building a XBee network with mesh capability (about that later), I did not want to go into “streaming” mode, its too slow, too unreliable and in the end overkill. The proper way of doing these networks is “beacon-based” where a central station (coordinator) requests a data package. While this is the right way of doing it, duplex communication over Xbee was a bit too much for me as first project and I put the timer on the sensor package. For the sampling interval, I now chose 30 seconds which I will reduce as soon as more sensors occupy my network. For this season however, this is fine.
How: Hardware: Arduino Uno, DHT-22, BMP180, XBee Radio, and the Sparkfun Weather Meters. Scraps of duct tape and double-sided tape to keep items from shifting inside the junction box. Various cables and generic connectors.
Code All code is in GitHub in this project.
General comment on code: I am not a programmer and the code evolved over a few months worth of trial and error. I am sure it can be improved and streamlined and in the end I will likely do so. For example, I rely heavily on global variables and floats, a very bad practice on Arduinos. For now it works.
The DHT22 is connected to Digital Pin 4 and uses a standard library. I trimmed down one of the examples and it generates temperature and humidity data as soon as its function is called. Its pretty easy and I stick with Celsius since I can’t get my head around Fahrenheit.
The BMP180 pressure sensor is defined as an object and I (full disclosure) I am not entirely clear on what the code does. The code has many redundant checks whether the sensor properly initialized or not but I don’t use any of them in subsequent communication. I will revisit this sensor next year, for now it gives me reliable data.
The Windvane was the one device that looked the most complicated but turned out to be very straight forward. It relies on a series of resistors to generate 16 distinct voltages depending where its pointing toward (datasheet). This in turn means that it can rely on a single analog pin (quite ingenious).

The code uses 2 arrays, the first are the nominal values that we expect from the resister/voltage output. The second array is the associated wind direction in degrees. The measured analog value (vaneReading) is sequentially compared against the values of the first array and the value with the smallest difference is chosen. The corresponding array position is then looked up in the second array which holds the wind directions. This should allow for some fluctuations of the sensor reading (temperature for example).
void windRose()
{
  vaneReading = analogRead(VANE_PIN); //read the analog signal from the Windvane, optional: float voltage= vaneReading * (5.0 / 1023.0);

  for (n = 0; n < 16; n++) //16 possible positions of the windvane
  {
    diff = vaneReading - pgm_read_word(&vaneValues[n]); // calculate the difference between the actual reading and the ideal valuye from the array
    diff = abs(diff);

    if (diff < allDiff) { //select the vaneValue with the smallest difference to the ideal. The vaneReading is a little noisy, this seems to take care of it
      allDiff = diff; //allDiff = smallest difference from the array compoarison.  Kind on bubblesort.  dont really need this value, for debugging
      allN = n; //allN is the position in the array with the smallest different between ideal and measured
    }
  }

  windDirection = (pgm_read_word(&vaneDirections[allN]) / 10); //report winddirection

  diff = 1000;  //set diff to something high so that the routine doesnt get stuck
  allDiff = 1000;
}

}
The rain sensor and anemometer work differently, they rely on interrupts to trigger counters. Arduino Unos have 2 interrupt pins (Pin 2 = Interrupt 0 and Pin 3 = Interrupt 1) and programming them is pretty straight forward. The math however is a little different since the interrupts are counted during the interval time, by definition they are averages, “interrupt counts / interval time”. For wind speed, it turned out that the interval time is too long, the values are all smoothed out. Hence I added another timer to measure gusts. For the code itself, I relied heavily on Kevin Kessler’s blog post installing the exact same sensor package. His programming skills far exceed mine and for good code, go there.
As a (unnecessary?) safety precaution, I turn the interrupts off during the assembly and transmission function. I’ll cover the XBee transmission in my next post.
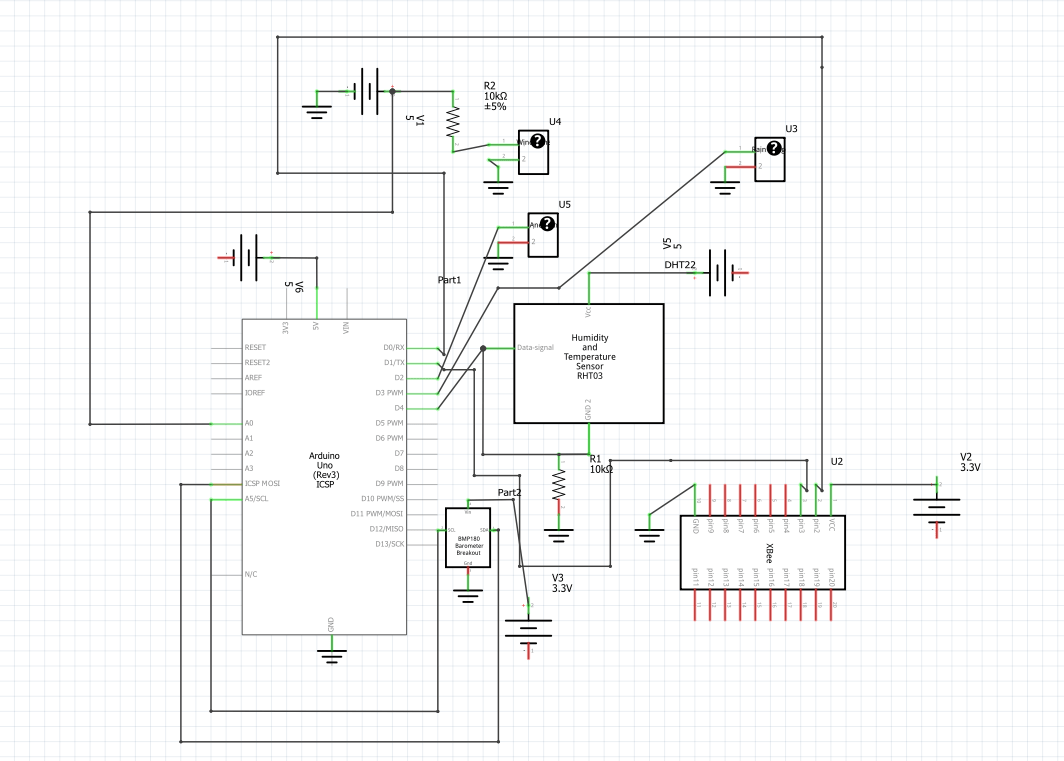
Below the Fritzing Schematic. I likely made mistakes in the wiring, first time working with formal layout programs.